Printed in China ZA31380
BG-1
CAUTION: READ THIS BEFORE OPERATING YOUR UNIT.
To assure the finest performance, please read this manual carefully. Keep it in a safe
place for future reference.
1 Install this unit in a well ventilated, cool, dry, clean place - away from direct
sunlight, heat sources, vibration, dust, moisture, and/or cold. (Do not use/keep this
unit in a car etc.)
2 Locate this unit away from other electrical appliances, motors, or transformers to
avoid humming sounds.
3 Do not expose this unit to sudden temperature changes from cold to hot, and do not
locate this unit in an environment with high humidity (i.e. a room with a
humidifier) to prevent condensation inside this unit, which may cause an electrical
shock, fire, damage to this unit, and/or personal injury.
4 Avoid installing this unit where foreign objects may fall onto this unit and/or this
unit may be exposed to liquid dripping or splashing. On the top of this unit, do
NOT place:
− Other components, as they may cause damage and/or discoloration on the
surface of this unit.
− Burning objects (i.e. candles), as they may cause fire, damage to this unit,
and/or personal injury.
− Containers with liquid in them, as they may fall and liquid may cause electrical
shock to the user and/or damage to this unit.
5 Do not cover this unit with a newspaper, tablecloth, curtain, etc. in order not to
obstruct heat radiation. If the temperature inside this unit rises, it may cause fire,
damage to this unit, and/or personal injury.
6 Do not operate this unit upside-down. They may overheat, possibly causing
damage.
7 Do not use force on switches, knobs, and/or cords.
8 When disconnecting the power cable from the wall outlet, grasp the AC plug; do
not pull the cord.
9 Do not clean this unit with chemical solvents; this might damage the finish. Use a
clean, dry cloth.
10 Only the voltage specified on this unit must be used. Using this unit with a higher
voltage than specified is dangerous and may cause fire, damage to this unit, and/or
personal injury. Yamaha will not be held responsible for any damage resulting
from use of this unit with a voltage other than that specified.
11 Do not attempt to modify or fix this unit. Contact qualified Yamaha service
personnel when any service is needed. The cabinet should never be opened for any
reason.
12 When not planning to use this unit for long periods of time (i.e. when going on
vacation), disconnect the power cable from the AC wall outlet.
13 Be sure to read the “TROUBLESHOOTING” section regarding common operating
errors before concluding that the unit is faulty.
14 Before moving this unit, disconnect the power cable from the wall outlet.
15 Be sure to use the AC adaptor supplied with this unit. Using an AC adaptor other
than the one provided may cause fire or damage to this unit.
16 Install this unit near the wall outlet and where the power cable can be reached
easily.
17 For added protection for this product during a lightning storm, or when it is left
unattended and unused for long periods of time, unplug it from the wall outlet.
This will prevent damage to the product due to lightning and power-line surges.
18 The batteries shall not be exposed to excessive heat such as sunshine, fire or the
like.
– Keep the batteries in a location out of reach of children. Batteries can be
dangerous if a child were to put in his or her mouth.
– If the batteries grow old, the effective operation range of the remote control
decreases considerably. If this happens, replace the batteries as soon as
possible.
– Do not use old batteries together with new ones.
– Do not use different types of batteries (such as alkaline and manganese
batteries) together. Read the packaging carefully as these different types of
batteries may have the same shape and color.
– Exhausted batteries may leak. If the batteries have leaked, dispose of them
immediately. Avoid touching the leaked material or letting it come into contact
with clothing, etc. Clean the battery compartment thoroughly before installing
new batteries.
– If you plan not to use the unit for a long period of time, remove the batteries
from the unit. Otherwise, the batteries will wear out, possibly resulting in a
leakage of battery liquid that may damage the unit.
– Do not throw away batteries with general house waste. Dispose of them
correctly in accordance with your local regulations.
There is a chance that placing this unit too close to a CRT-based (Braun tube) TV set might
impair picture color. Should this happen, move this unit away from the TV set.
WARNING
TO REDUCE THE RISK OF FIRE OR ELECTRIC SHOCK, DO NOT EXPOSE THIS UNIT
TO RAIN OR MOISTURE.
Even if an iPhone or iPod is not connected to this unit, this unit is not disconnected from the
AC power source as long as it is connected to the wall outlet. In this state, this unit is designed
to consume a very small quantity of power.
CAUTION
Danger of explosion if battery is incorrectly replaced. Replace only with the same or equivalent type.
For U.K. customers
If the socket outlets in the home are not suitable for the plug supplied with this appliance, it should
be cut off and an appropriate 3 pin plug fitted. For details, refer to the instructions described below.
Note
The plug severed from the mains lead must be destroyed, as a plug with bared flexible cord is
hazardous if engaged in a live socket outlet.
Information for Users on Collection and Disposal of Old Equipment and
used Batteries
These symbols specified in the Directives 2002/96/EC and 2006/66/EC indicate
that used electrical and electronic products and batteries should not be mixed with
general household waste.
For proper treatment to avoid harmful effect on human health and environment,
please contact your local municipality, your waste disposal service or the point of sale
where you purchased the items.
Note for the battery symbol (bottom two symbol examples):
This symbol might be used in combination with a chemical symbol. In this case it
complies with the requirement set by the Directive for the chemical involved.
SPECIAL INSTRUCTIONS FOR U.K. MODEL
IMPORTANT
THE WIRES IN MAINS LEAD ARE COLOURED IN ACCORDANCE WITH THE
FOLLOWING CODE:
Blue: NEUTRAL
Brown: LIVE
As the colours of the wires in the mains lead of this apparatus may not correspond with
the coloured markings identifying the terminals in your plug, proceed as follows:
The wire which is coloured BLUE must be connected to the terminal which is marked with
the letter N or coloured BLACK. The wire which is coloured BROWN must be connected to
the terminal which is marked with the letter L or coloured RED.
Making sure that neither core is connected to the earth terminal of the three pin plug.
Important Notice: Guarantee Information for customers in EEA* and Switzerland
For detailed guarantee information about this Yamaha product, and Pan-EEA* and Switzerland warranty service, please either visit the website address below (Printable file is available at our
website) or contact the Yamaha representative office for your country. * EEA: European Economic Area
(http://europe.yamaha.com/warranty/)
AVEEA71102A
http://europe.yamaha.com/warranty/
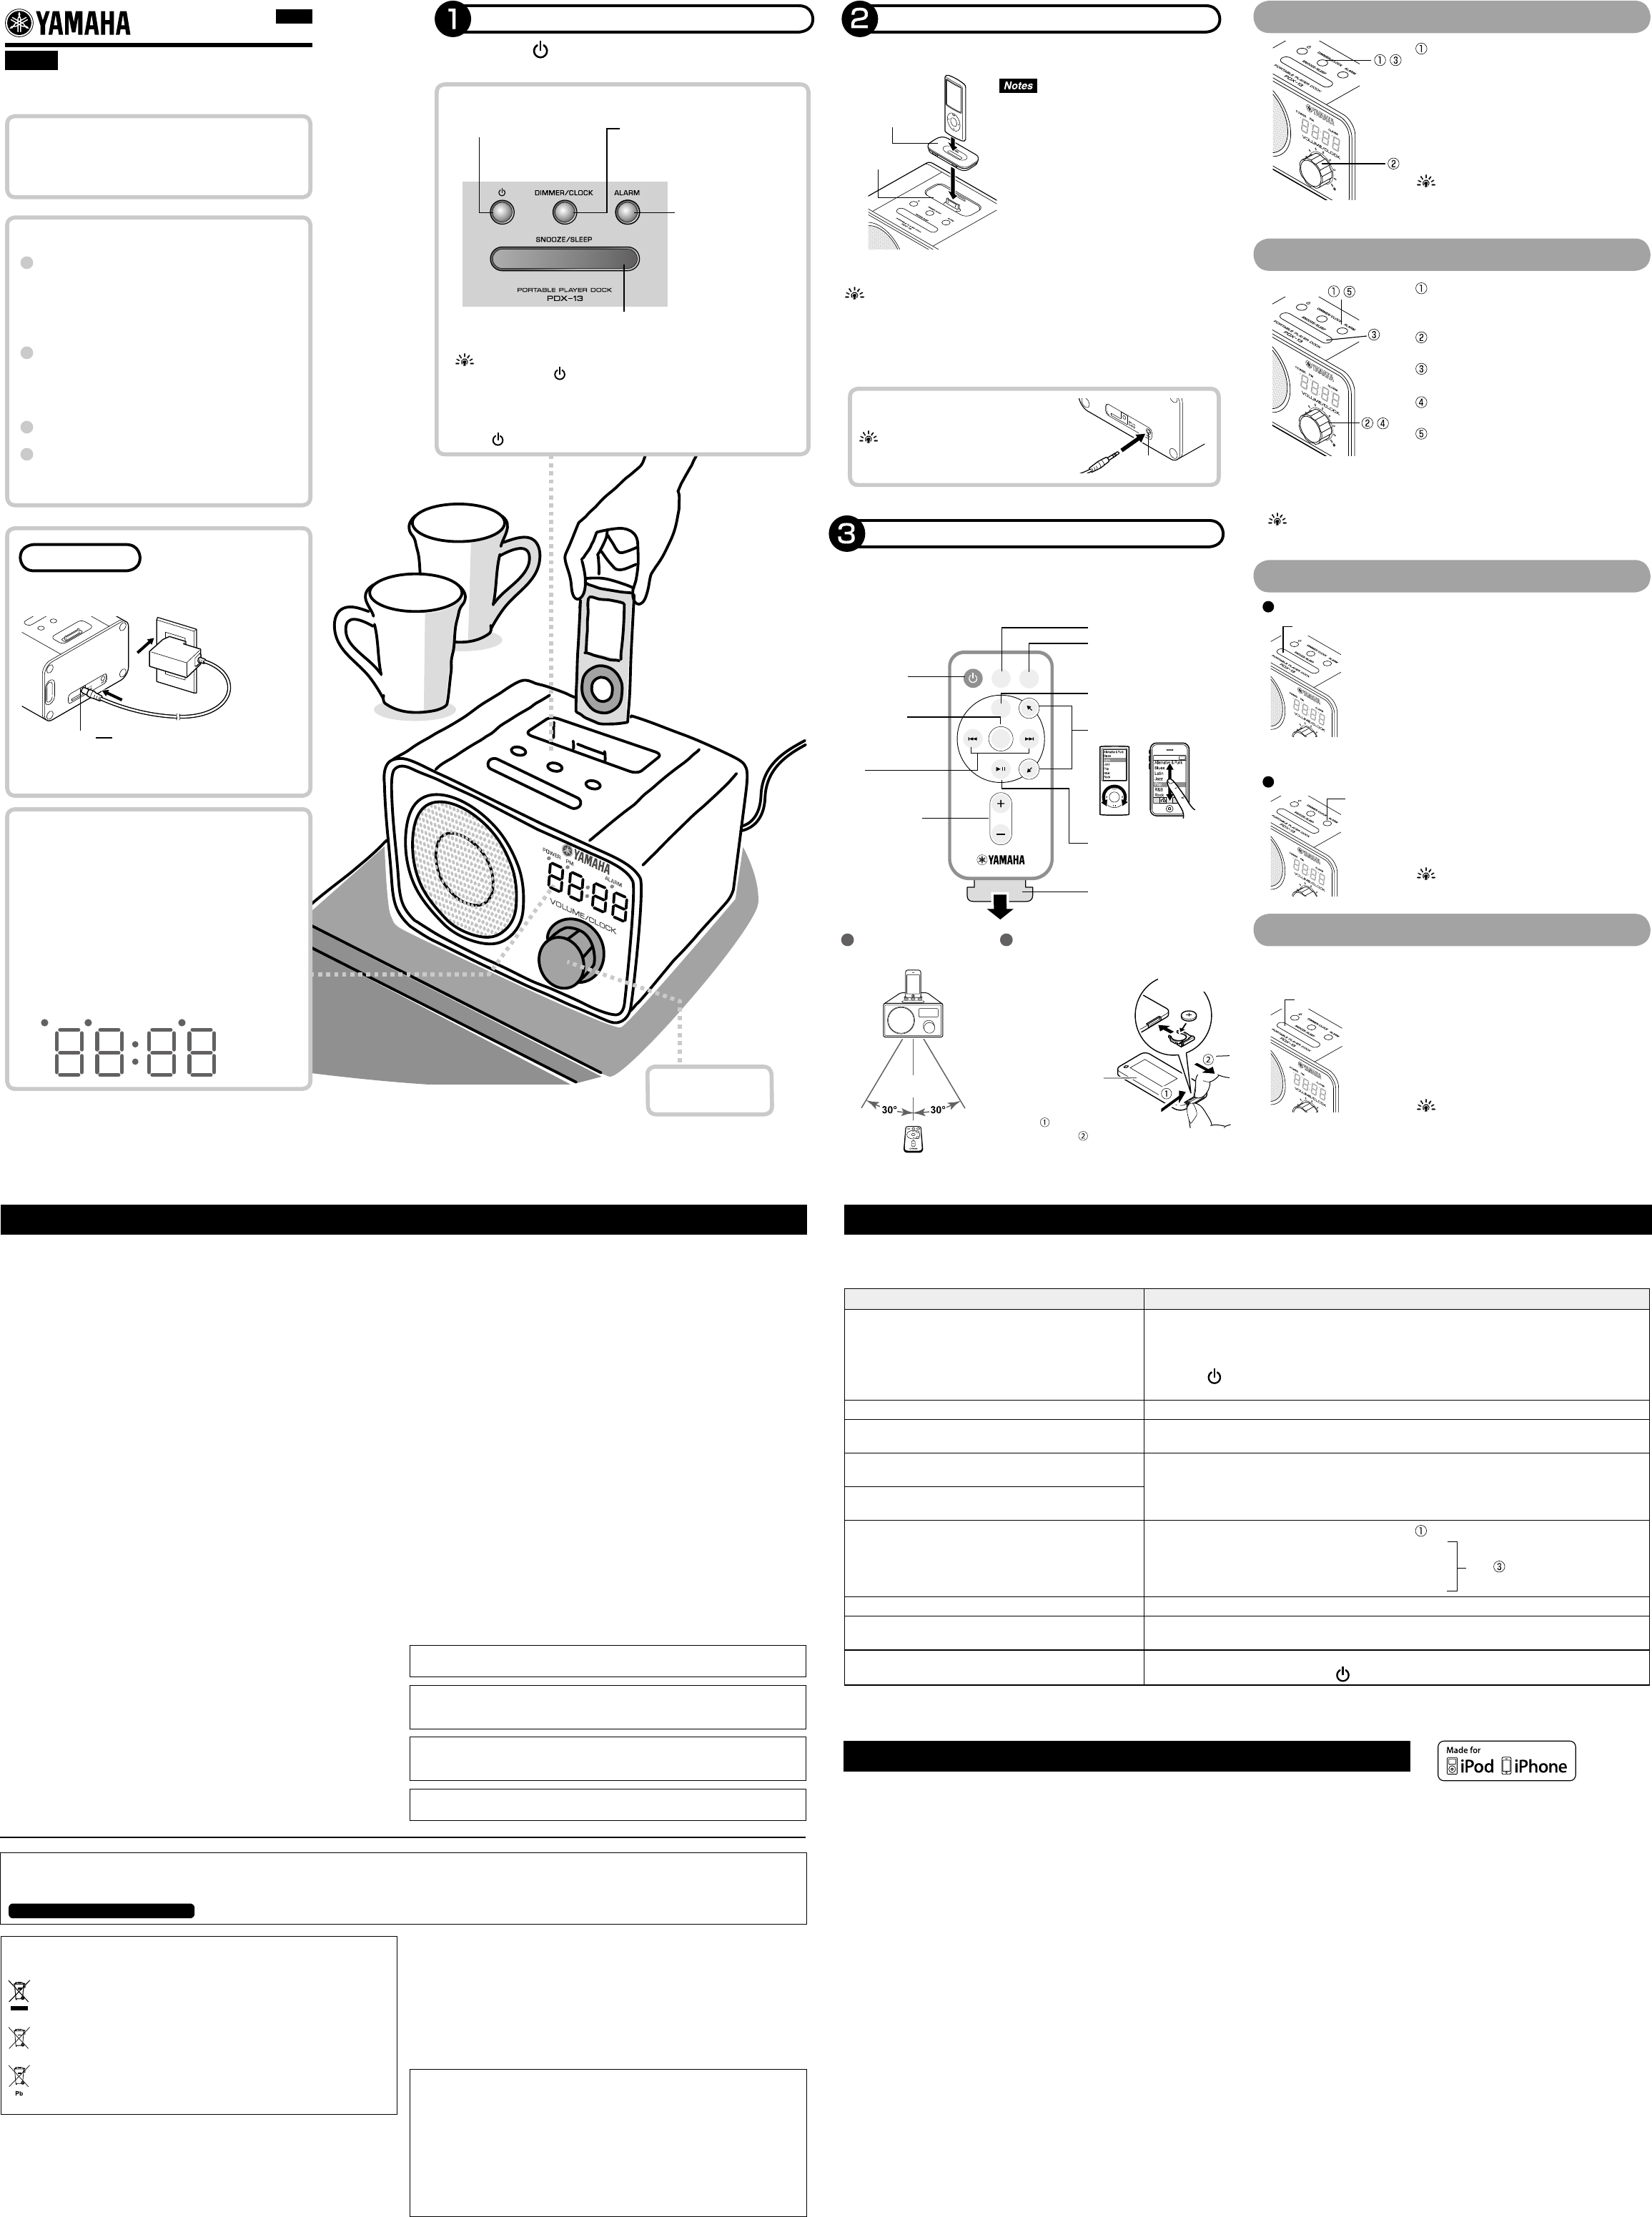
Setting the clock
Setting the alarm
Stopping the alarm
Press and hold down the for three seconds or longer to activate the power-saving
mode.
During the power-saving mode, the front panel display turns off. Then the
operations from the remote control, alarm function, and iPhone/iPod charge
function are disabled.
Press the
on the control panel to cancel the power-saving mode.
Press and hold down the
DIMMER/CLOCK
on the control panel for two seconds or
longer.
The time display will blink.
②
Turn the VOLUME/CLOCK to set to the
current time.
③
Push the DIMMER/CLOCK to set the time.
The time display will light up.
The display will switch between 12-hour display (12H)
and 24-hour display (24H) each time the SNOOZE/
SLEEP is pushed, when setting the clock’s time.
Press and hold down the ALARM on the
control panel for two seconds or longer.
ALARM LED and time display will blink.
Turn the VOLUME/CLOCK to set the
alarm time.
Push the SNOOZE/SLEEP.
The alarm volume display will blink.
Turn the VOLUME/CLOCK to adjust the
alarm volume.
Push the ALARM to complete the setting.
The ALARM LED and time display will light up.
Push the SNOOZE/SLEEP on the control
panel or remote control.
The alarm will turn off and start again in fi ve minutes.
• If the iPhone/iPod is connected, the beeping sound will
stop when the SNOOZE/SLEEP is pushed once and the
iPhone/iPod’s playback will stop when pushed twice.
• After fi ve minutes of stopping the iPhone/iPod’s
playback, the playback will start again with an
increasing volume, then the beeping sound will start.
• During the snooze state, the ALARM LED and POWER
LED will blink.
Push the ALARM on the control panel or remote
control.
• The iPhone/iPod play and beeping sound will stop, and
the alarm will turn off.
• The ALARM LED will turn off.
If the alarm is not turned off, it turns off automatically
after 60 minutes.
Three minutes before the alarm time, the iPhone/iPod will start playing the current song at
a low volume which will gradually increase.
When the alarm time is reached, a “beeping” sound will start.
Connect the iPhone/iPod before the set alarm time.
If an iPhone/iPod is not connected, the beeping sound will start at the alarm time.
Power on/off DIMMER/CLOCK
• Switches the brightness of the front panel
display (Three levels)
• Sets the clock’s time
ALARM
• Switches the alarm’s
on/off status
• Sets the alarm
SNOOZE/SLEEP
Push to enable the snooze function and set
the sleep timer.
Turning the alarm off
AUX
Within 6 m
(20 feet)
Using the sleep timer
Repeatedly press the SNOOZE/SLEEP on the
control panel or remote control, and select the
timer time.
• The display will alternate in the order of "30" → "60" →
"90" → "120" → "current time" with each press of the
button.
• The current time will appear and the POWER LED will
blink, when the sleep timer is set.
Press the SNOOZE/SLEEP to disable the sleep timer
during the sleep timer is activated. The POWER LED will
turn on.
The power is turned off automatically, after the elapse of a period of time (30/60/90/120
minutes).
SNOOZE/SLEEP
ALARM
Dock adaptor
iPod dock
Portable Player Dock
PDX-13
Owner's Manual
Turning on the Power
Push the (Power).
When the power is on, the POWER LED will light up.
Connecting Music Devices
Connect the iPhone/iPod to the iPod dock.
The battery of the connected iPhone/iPod will be charged.
•
Be sure to use a dock adaptor included your iPhone/
iPod or applicable commercially available dock
adaptor. If you do not use an adaptor or the adaptor is
not compatible, the connection may be loose or poor,
causing damage to the connector. For more information
about the dock adaptor, refer to Apple's website.
• If the iPhone/iPod is forcibly connected while still
in a protective case, the connector may be damaged.
Make sure to remove any protective iPhone/iPod case
before connecting.
• When the unit is used with the iPhone/iPod shake
shuffl e function on, the iPhone/iPod might shuffl e due
to the vibration of speaker depending on the music
played back. If this happens, turn the shake shuffl e
function off. (Refer to the instruction manual of the iPhone/iPod to turn the function off.)
• If the iPhone/iPod is connected while playing videos or music on the iPhone/iPod, PDX-13
will turn on automatically and continue the play (except when PDX-13 is in power-saving
mode).
• You can always connect and disconnect the iPhone/iPod.
• The PDX-13’s volume level can be adjusted using the iPhone/iPod. The volume level will
also be displayed on the iPhone/ iPod.
Connecting an External Device
Connect to the AUX on the rear panel.
To connect an external device to PDX-13, use a
commercially available 3.5 mm (1/8 in.) stereo mini
plug cable.
Playing Audio
If you start playback on the connected device, sound will come
from the PDX-13's speaker.
iPhone/iPod's playback can be controlled using either the included
remote control or the iPhone/iPod itself.
VOLUME
FOLDER
ALARM
MENU
SNOOZE
/SLEEP
Select menu
Show iPhone/iPod's menu
Skip
Backward/Forward
Select folder
Volume control
Play/Pause
Power on/off
Alarm on/off
Push to enable the snooze
function and set the sleep
timer.
Remove the insulation
sheet before using.
Operate by the
Remote control
Replacing the Battery
Pull out the battery case as
shown in the diagram below
and change a battery.
While pushing the release tab in
direction , slide out the battery
holder in direction
.
Back
CR2025 button
cell battery.
Turning the alarm off temporarily (snooze function)
English
Control Panel
The current time is
displayed even when
the power is off.
SNOOZE/SLEEP
TROUBLESHOOTING
Refer to the table below if the unit does not operate properly. If the problem you are experiencing is not listed below, or if the instruction below does not
help, turn off the unit, disconnect the power cable, and contact the nearest authorized Yamaha dealer or service center.
Situation Remedies and Points to Confi rm
No sound
Is the iPhone/iPod connected securely to the iPod dock? •
Are PDX-13 and the external device’s connector cable connected securely? Are the connector •
cable and the external device connected securely?
Is the AC adaptor connected securely? •
Push the •
to turn on PDX-13.
Is the volume turned down? •
Suddenly no sound
Has the sleep timer been set?
Even if the volume level is raised, the sound level
does not increase.
It is possible that the protection circuitry has been activated by excessive volume. Reduce the
volume level.
Even if the volume level of the connected iPhone/
iPod is changed, the sound level does not change.
Is the connected iPhone/iPod compatible with PDX-13? •
(
☞
"SPECIFICATIONS")
Is the iPhone/iPod connected securely to the iPod dock? •
The iPhone/iPod cannot be controlled using the
remote control.
PDX-13 cannot be controlled using the remote
control.
Has the power-saving mode been activated? ( •
☞
"
Turning on the Power")
Are you outside of the remote control operating range? •
Has the remote control’s battery been exhausted, •
or is it inserted incorrectly?
(
☞
"
Playing Audio")
Has the insulation sheet been removed? •
iPhone/iPod does not play at alarm time.
Is the iPhone/iPod connected securely to the iPod dock?
The settings such as the alarm time and clock's
time are changed.
If the electric supply is interrupted due to the power outage, etc. around half a day, the settings
could be changed. In that case, set them again.
PDX-13 does not operate at all.
In some cases, resetting PDX-13 can solve the problem.
To reset PDX-13, push and hold the
on the control panel for 10 seconds or more.
SPECIFICATIONS
Supported iPod ............................ iPod touch (1st, 2nd, 3rd and 4th generations), iPod classic, iPod with video,
iPod nano (1st, 2nd, 3rd, 4th, 5th and 6th generations)
Supported iPhone ............................................................................... iPhone 4, iPhone 3GS, iPhone 3G, iPhone
AUX
Input connector ............................................................................... ø 3.5 mm (1/8 in.) stereo mini jack
Power supply
U.S.A. and Canada models ......................................................................................... AC 120 V, 60 Hz
Other models ............................................................................................... AC 100 to 240 V, 50/60 Hz
Power consumption ......................................................................................................................................... 8 W
Power consumption when power off and the iPhone/iPod is disconnected ......................................1.5 W or less
(Power-saving mode: 0.5 W or less)
AC adaptor ...........................................................
MU18-D120150-B2 or MU18-D120150-C5 (DC 12 V, 1.5
A)
Dimensions (W × H × D) ............................................... 160 mm × 99 mm × 125 mm (6 1/4" × 3 7/8" × 4 7/8")
Weight ...............................................................................................................................................0.9 kg (2 lbs)
* To play an unsupported iPod, such as a 4th generation (or earlier) iPod, iPod shuffl e, iPod photo, and iPod
mini, connect the iPod to AUX and use it as an external device.
* Specifi cations are subject to change without notice.
* The name plate is located on the bottom of the unit.
"Made for iPod" and "Made for iPhone"
mean that an electronic accessory has been
designed to connect specifi cally to iPod or
iPhone, respectively, and has been certifi ed
by the developer to meet Apple performance
standards.
Apple is not responsible for the operation of
this device or its compliance with safety and
regulatory standards. Please note that the
use of this accessory with iPod or iPhone
may affect wireless performance.
iPhone, iPod, iPod classic, iPod nano,
iPod touch and iTunes are trademarks of
Apple Inc., registered in the U.S. and other
countries.
Supplied Accessories
Please confi rm that the following accessories are
included before using the unit.
• Remote control • AC adaptor
Front Panel Display
Displays the current time, alarm time, and the
volume.
POWER PM ALARM
POWER LED
Lights up when the PDX-13’s power is turned on.
Blinks when the sleep timer is set.
PM LED
When displaying the time with the 12-hour display, stays off during
the a.m. hours and lights up during the p.m. hours.
ALARM LED
Lights up when the alarm is set.
Multi-Source Mix
When an iPhone/iPod and another external device
are connected to PDX-13, audio can be enjoyed in
many ways—for example, by playing music while
listening to the news.
Integrated Volume Control
You can control the PDX-13's volume level by
operating the volume control function on the
iPhone/iPod.
Charge Your iPhone/iPod Battery
Alarm Function
Use the alarm function to wake up to music from
your iPhone or iPod.
Features
Before Use
Connect the included AC adaptor.
Connect the AC adaptor to PDX-13, before
connecting the power cable to the wall outlet.
12V
---
①
②
VOLUME/CLOCK
Adjusts the volume/time.
 (2 pages)


 (12 pages)


 Manymanuals.com
 Manymanuals.de
 Manymanuals.fr
 Manymanuals.it
 Manymanuals.pl
 Manymanuals.cz
 Manymanuals.es
 Manymanuals-pt.com
Commentaires sur ces manuels